Machine Learning Field Guide

Super passionate up and coming data scientist documenting my journey! I dedicate my time to learning and creating ML content (data science projects and blog posts).
We all have to deal with data, and we try to learn about and implement machine learning into our projects. But everyone seems to forget one thing... it's far from perfect, and there is so much to go through! Don't worry, we'll discuss every little step, from start to finish 👀.
All you'll need are these fundementals
The Story Behind it All
We all start with either a dataset or a goal in mind. Once we've found, collected or scraped our data, we pull it up, and witness the overwhelming sight of merciless cells of numbers, more numbers, categories, and maybe some words 😨! A naive thought crosses our mind, to use our machine learning prowess to deal with this tangled mess... but a quick search reveals the host of tasks we'll need to consider before training a model 😱!
Once we overcome the shock of our unruly data we look for ways to battle our formidable nemesis 🤔. We start with trying to get our data into Python. It is relatively simple on paper, but the process can be slightly... involved. Nonetheless, a little effort was all that was needed (lucky us).
Without wasting any time we begin data cleaning to get rid of the bogus and expose the beautiful. Our methods start simple - observe and remove. It works a few times, but then we realise... it really doesn't do us justice! To deal with the mess though, we find a powerful tool to add to our arsenal: charts! With our graphs, we can get a feel for our data, the patterns within it and where things are missing. We can interpolating (fill in) or removing missing data.
Finally, we approach our highly anticipated 😎 challenge, data modelling! With a little research, we find out which tactics and models are commonly used. It is a little difficult to decipher which one we should use, but we still manage to get through it and figure it all out!
We can't finish a project without doing something impressive though. So, a final product, website, app or even a report will take us far! We know first impressions are important so we fix up the GitHub repository and make sure everything's well documented and explained. Now we are finally able to show off our hard work to the rest of the world 😎!
The epochs
Chapter 1 - Importing Data
Data comes in all kinds of shapes and sizes and so the process we use to get everything into code often varies.
Let's be real, importing data seems easy, but sometimes... it's a little pesky.
The hard part about data cleaning isn't the coding or theory, but instead our preparation! When we first start a new project and download our dataset, it can be tempting to open up a code editor and start typing... but this won't do us any good. If we want to get a head start we need to prepare ourselves for the best and worst parts of our data. To do this we'll need to start basic, by manually inspecting our spreadsheet/s. Once we understand the basic format of the data (filetype along with any particularities) we can move onto getting it all into Python.
When we're lucky and just have one spreadsheet we can use the Pandas read_csv function (letting it know where our data lies):
pd.read_csv("file_path.csv")
In reality, we run into way more complex situations, so look out for:
- File starts with unneeded information (which we need to skip)
- We only want to import a few columns
- We want to rename our columns
- Data includes dates
- We want to combine data from multiple sources into one place
- Data can be grouped together
Although we're discussing a range of scenarios, we normally only deal with a few at a time.
Our first few problems (importing specific parts of our data/renaming columns) are easy enough to deal with using a few parameters, like the number of rows to skip, the specific columns to import and our column names:
pd.read_csv("file_path.csv", skiprows=5, usecols=[0, 1], names=["Column1", "Column2"])
Whenever our data is spread across multiple files, we can combine them using Pandas concat function.
The concat function combines a list of DataFrame's together:
my_spreadsheets = [pd.read_csv("first_spreadsheet.csv"), pd.read_csv("second_spreadsheet.csv")]
pd.concat(my_spreadsheets, ignore_index=True)
We parse to concat a list of spreadsheets (which we import just like before).
The list can, of course, be attained in any way (so a fancy list comprehension or a casual list of every file both work just as well), but just remember that we need dataframes, not filenames/paths!
If we don't have a CSV file Pandas still works!
We can just swap out read_csv for read_excel, read_sql or another option.
After all the data is inside a Pandas dataframe, we need to double-check that our data is formatted correctly.
In practice, this means checking each series datatype, and making sure they are not generic objects.
We do this to ensure that we can utilize Pandas inbuilt functionality for numeric, categorical and date/time values.
To look at this just run DataFrame.dtypes.
If the output seems reasonable (i.e. numbers are numeric, categories are categorical, ect), then we should be fine to move on.
However, this normally is not the case, and as we need to change our datatypes!
This can be done with Pandas DataFrame.astype.
If this doesn't work, there should be another more Pandas function for that specific conversion:
data["Rating"] = data["Rating"].as_type("category")
data["Number"] = pd.to_numeric(data["Number"])
data["Date"] = pd.to_datetime(data["Date"])
data["Date"] = pd.to_datetime(data[["Year", "Month", "Day", "Hour", "Minute"]])
If we need to analyse separate groups of data (i.e. maybe our data is divided by country), we can use Pandas groupby.
We can use groupby to select particular data, and to run functions on each group separately:
data.groupby("Country").get_group("Australia")
data.groupby("Country").mean()
Other more niche tricks like multi/hierarchical indices can also be helpful in specific scenarios, however, are more tricky to understand and use.
Chapter 2 - Data Cleaning
Data is useful, data is necessary, however, it needs to be clean and to the point! If our data is everywhere, it simply won't be of any use to our machine learning model.
Everyone is driven insane by missing data, but there's always a light at the end of the tunnel.
The easiest and quickest way to go through data cleaning is to ask ourselves:
What features within our data will impact our end-goal?
By end-goal, we mean whatever variable we are working towards predicting, categorising or analysing. The point of this is to narrow our scope and not get bogged down in useless information.

Once we know what our primary objective features are, we can try to find patterns, relations, missing data and more. An easy and intuitive way to do this is graphing! Quickly use Pandas to sketch out each variable in the dataset, and try to see where everything fits into place.
Once we have identified potential problems, or trends in the data we can try and fix them. In general, we have the following options:
- Remove missing entries
- Remove full columns of data
- Fill in missing data entries
- Resample data (i.e. change the resolution)
- Gather more information
To go from identifying missing data to choosing what to do with it we need to consider how it affects our end-goal. With missing data we remove anything which doesn't seem to have a major influence on the end result (i.e. we couldn't find a meaningful pattern), or where there just seems too much missing to derive value. Sometimes we also decide to remove very small amounts of missing data (since it's easier than filling it in).
If we've decided to get rid of information, Pandas DataFrame.drop can be used.
It removes columns or rows from a dataframe.
It is quite easy to use, but remember that Pandas does not modify/remove data from the source dataframe by default, so inplace=True must be specified.
It may be useful to note that the axis parameter specifies whether rows or columns are being removed.
When not removing a full column, or particularly targeting missing data, it can often be useful to rely on a few nifty Pandas functions.
For removing null values, DataFrame.dropna can be utilized.
Do keep in mind though that by default, dropna completely removes all missing values.
However, setting either the parameter how to all or setting a threshold (thresh, representing how many null values are required for it to delete) can compensate for this.
If we've got small amounts of irregular missing values, we can fill them in several ways.
The simplest is DataFrame.fillna which sets the missing values to some preset value.
The more complex, but flexible option is interpolation using DataFrame.interpolate.
Interpolation essentially allows anyone to simply set the method they would like to replace each null value with.
These include the previous/next value, linear and time (the last two deduce based on the data).
Whenever working with time, time is a natural choice, and otherwise make a reasonable choice based on how much data is being interpolated and how complex it is.
data["Column"].fillna(0, inplace=True)
data[["Column"]] = data[["Column"]].interpolate(method="linear")
As seen above, interpolate needs to be passed in a dataframe purely containing the columns with missing data (otherwise an error will be thrown).
Resampling is useful can whenever we see regularly missing data or have multiple sources of data using different timescales (like ensuring measurements in minutes and hours can be combined). It can be slightly difficult to intuitively understand resampling, but it is essential when you average measurements over a certain timeframe. For example, we can get monthly values by specifying that we want to get the mean of each month's values:
data.resample("M").mean()
The "M" stands for month and can be replaced with "Y" for year and other options.
Although the data cleaning process can be quite challenging, if we remember our initial intent, it becomes a far more logical and straight forward task! If we still don't have the needed data, we may need to go back to phase one and collect some more. Note that missing data indicates a problem with data collection, so it's useful to carefully consider, and note down where occurs.
For completion, the Pandas unique and value_counts functions are useful to decide which features to straight-up remove and which to graph/research.
Chapter 3 - Visualisation
Visualisation sounds simple and it is, but it's hard to... not overcomplicate. It's far too easy for us to consider plots as a chore to create. Yet, these bad boys do one thing very, very well - intuitively demonstrate the inner workings of our data! Just remember:
We graph data to find and explain how everything works.
Hence, when stuck for ideas, or not quite sure what to do, we basics can always fall back on identifying useful patterns and meaningful relationships. It may seem iffy 🥶, but it is really useful.
Our goal isn't to draw fancy hexagon plots, but instead to picture what is going on, so absolutely anyone can simply interpret a complex system!
A few techniques are undeniably useful:
- Resampling when we have too much data
- Secondary axis when plots have different scales
- Grouping when our data can be split categorically
To get started graphing, simply use Pandas .plot() on any series or dataframe!
When we need more, we can delve into MatPlotLib, Seaborn or an interactive plotting library.
data.plot(x="column 1 name", y="column 2 name", kind="bar", figsize=(10, 10))
data.plot(x="column 1 name", y="column 3 name", secondary_y=True)
data.hist()
data.groupby("group").boxplot()
90% of the time, this basic functionality will suffice (more info here), and where it doesn't a search should reveal how to draw particularly exotic graphs 😏.

Chapter 4 - Modelling
A Brief Overview
Now finally for the fun stuff - deriving results. It seems so simple to train a scikit learn model, but no one goes into the details! So, let's be honest here, not every dataset, nor model are equal.
Our approach to modelling will vary widely based on our data. There are three especially important factors:
- Type of problem
- Amount of data
- Complexity of data
Our type of problem comes down to whether we are trying to predict a class/label (called classification), a value (called regression), or to group data (called clustering). If we are trying to train a model on a dataset where we already have examples of what we're trying to predict we call our model supervised, if not, unsupervised. The amount of available data, and how complex it is foreshadows how simple a model will suffice. Data with more features (i.e. columns) tends to be more complex.
The point of interpreting complexity is to understand which models are too good or too bad for our data
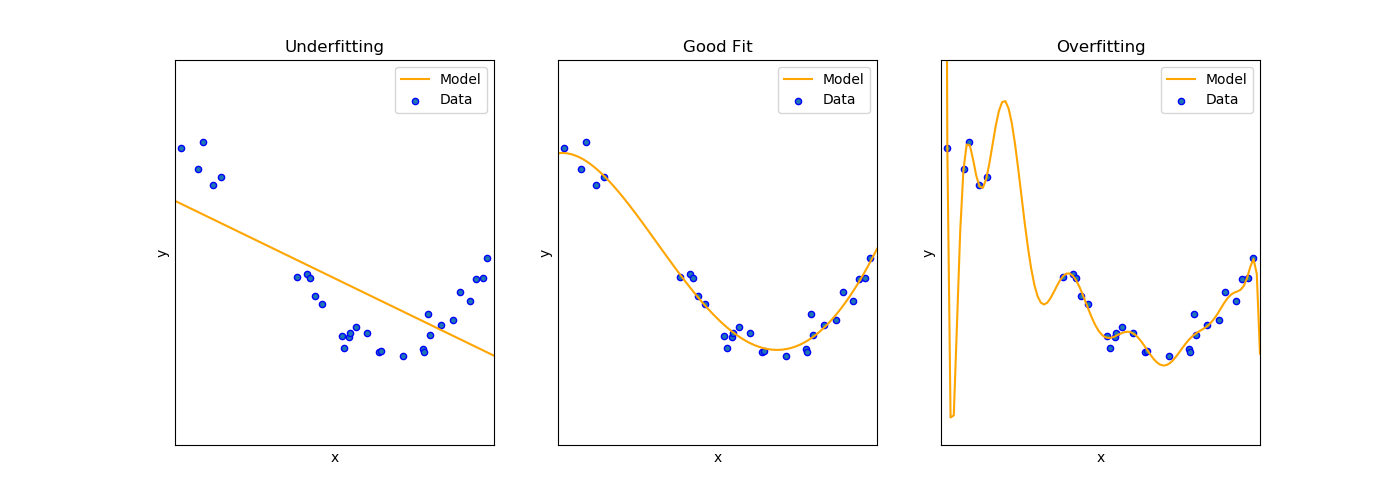
Models goodness of fit informs us on this! If a model struggles to interpret our data (too simple) we can say it underfits, and if it is completely overkill (too complex) we say it overfits. We can think of it as a spectrum from learning nothing to memorising everything. We need to strike balance, to ensure our model is able to generalise our conclusions to new information. This is typically known as the bias-variance tradeoff. Note that complexity also affects model interpretability.
Complex models take substantially more time to train, especially with large datasets. So, upgrade that computer, run the model overnight, and chill for a while 😁!
Preparation
Splitting up data
Before training a model it is important to note that we will need some dataset to test it on (so we know how well it performs). Hence, we often divide our dataset into separate training and testing sets. This allows us to test how well our model can generalise to new unseen data. This normally works because we know our data is decently representative of the real world.
The actual amount of test data doesn't matter too much, but 80% train and 20% test is often used.
In Python with Scikit learn the train_test_split function does this:
train_data, test_data = train_test_split(data)
Cross-validation is where a dataset is split into several folds (i.e. subsets or portions of the original dataset). This tends to be more robust and resistant to overfitting than using a single test/validation set! Several Sklearn functions help with cross-validation, however, it's normally done straight through a grid or random search (discussed below).
cross_val_score(model, input_data, output_data, cv=5)
Hyperparameter tuning
There are some factors our model cannot account for, and so we set certain hyperparameters. These vary model to model, but we can either find optimal values through manual trial and error or a simple algorithm like grid or random search. With grid search, we try all possible values (brute force 😇) and with random search random values from within some distribution/selection. Both approaches typically use cross-validation.
Grid search in Sklearn works through a parameters dictionary.
Each entries key represents the hyperparameter to tune, and the value (a list or tuple) is the selection of values to chose from:
parameters = {'kernel':('linear', 'rbf'), 'C':[1, 10]}
model = = SVC()
grid = GridSearchCV(model, param_grid=parameters)
After we've created the grid, we can use it to train the models, and extract the scores:
grid.fit(train_input, train_output)
best_score, best_depth = grid.best_score_, grid.best_params_
The important thing here is to remember that we need to train on the training and not testing data. Even though cross-validation is used to test the models, we're ultimately trying to get the best fit on the training data and will proceed to test each model on the testing set afterwards:
test_predictions = grid.predict(test_input)
Random search in Sklearn works similarly but is slightly more complex as we need to know what type of distribution each hyperparameter takes in. Although it, in theory, can yield the same or better results faster, that changes from situation to situation. For simplicity it is likely best to stick to a grid search.
Model Choices
Using a model
With Sklearn, it's as simple as finding our desired model name and then just creating a variable for it. Check the links to the documentation for further details! For example
support_vector_regressor = SVR()
Basic Choices
Linear/Logistic Regression
Linear regression is trying to fit a straight line to our data. It is the most basic and fundamental model. There are several variants of linear regression, like lasso and ridge regression (which are regularisation methods to prevent overfitting). Polynomial regression can be used to fit curves of higher degrees (like parabolas and other curves). Logistic regression is another variant which can be used for classification.
Support Vector Machines
Just like with linear/logistic regression, support vector machines (SVM's) try to fit a line or curve to data points. However, with SVM's the aim is to maximise the distance between a boundary and each point (instead of getting the line/curve to go through each point).
The main advantage of support vector machines is their ability to use different kernels. A kernel is a function which calculates similarity. These kernels allow for both linear and non-linear data, whilst staying decently efficient. The kernels map the input into a higher dimensional space so a boundary becomes present. This process is typically not feasible for large numbers of features. A neural network or another model will then likely be a better choice!
Neural Networks
All the buzz is always about deep learning and neural networks. They are complex, slow and resource-intensive models which can be used for complex data. Yet, they are extremely useful when encountering large unstructured datasets.
When using a neural net, make sure to watch out for overfitting. An easy way is through tracking changes in error with time (known as learning curves).
Deep learning is an extremely rich field, so there is far too much to discuss here. In fact, Scikit learn is a machine learning library, with little deep learning abilities (compared to PyTorch or TensorFlow).
Decision Trees
Decision trees are simple and quick ways to model relationships. They are basically a tree of decisions which help to decide on what class or label a datapoint belongs too. Decision trees can be used for regression problems too. Although simple, to avoid overfitting, several hyperparameters must be chosen. These all, in general, relate to how deep the tree is and how many decisions are to be made.
K-Means
We can group unlabeled data into several clusters using k-means. Normally the number of clusters present is a chosen hyperparameter.
K-means works by trying to optimize (reduce) some criterion (i.e. function) called inertia. It can be thought of like trying to minimize the distance from a set of centroids to each data point.
Ensembles
Random Forests
Random forests are combinations of multiple decision trees trained on random subsets of the data (bootstrapping). This process is called bagging and allows random forests to obtain a good fit (low bias and low variance) with complex data.
The rationale behind this can be likened to democracy.
One voter may vote for a bad candidate, but we'd hope that the majority of voters make informed, positive decisions
For regression problems, we average each decision tree's outputs, and for classification, we choose the most popular one. This might not always work, but we generally assume it will (especially with large datasets with multiple columns).
Another advantage with random forests is that insignificant features shouldn't negatively impact performance because of the democratic-esc bootstrapping process!
Hyperparameter choices are the same as those for decision trees but with the number of decision trees as well. For the aforementioned reasons, more trees equal less overfitting!
Note that random forests use random subsets with the replacement of rows and columns!

Gradient Boosting
Ensemble models like AdaBoost or XGBoost work by stacking one model on top of another. The assumption here is that each successive weak learner will correct for the flaws of the previous one (hence called boosting). Hence, the combination of models should provide the advantages of each model without its potential pitfalls.
The iterative approach means previous models performances effects current models, and better models are given a higher priority. Boosted models perform slightly better than bagging models (a.k.a random forests), but are also slightly more likely to overfit. Sklearn provides AdaBoost for classification and regression.
Chapter 5 - Production
This is the last but potentially most important part of the process 🧐. We've put in all this work, and so we need to go the distance and create something impressive!
There are a variety of options. Streamlit is an exciting option for data-oriented websites, and tools like Kotlin, Swift and Dart can be used for Android/IOS development. JavaScript with frameworks like VueJS can also be used for extra flexibility.
After trying most of these I honestly would recommend sticking to Streamlit, since it is so much easier than the others!
Here it is important to start with a vision (simpler the better) and try to find out which parts are most important. Then try and specifically work on those. Continue till completion! For websites, a hosting service like Heroku will be needed, so the rest of the world can see the amazing end-product of all our hard work 🤯😱.
Even if none of the above options above suit the scenario, a report or article covering what we've done, what we've learnt and any suggestions/lessons learnt along with a well documented GitHub repository are indispensable! Make sure that readme file is up to date.

THANKS FOR READING!
I really hope this article has helped you out! For updates follow me on Twitter.
If you enjoyed this, you may also like The Complete Coding Practitioners Handbook which goes through each and every practical coding tool you'll need to know. If you're lost considering what project to take on, consider checkout out my zero-to-hero guide on choosing a project and collecting your own dataset through webscraping.
Photos by National Cancer Institute, Dane Deaner, ThisisEngineering RAEng, Adam Nowakowski and Guilherme Caetano on Unsplash. The goodness of fit graph is a modified version of the Sklearn documentation